This article first appeared in BrickJournal Issue 32, 2015
Powered Attachments
If you’ve been following along with our previous articles, you’ll be familiar with making your robot drive around, as well as some basic use of the sensors. This article will now focus on the Medium motor that you get with the EV3 kit and how it can be used as a powered attachment for your robot.
This is a condensed version of a chapter from my Classroom Activities for the Busy Teacher: EV3 book. For this article, I’ll be using my Gripper design from the RileyRover build.

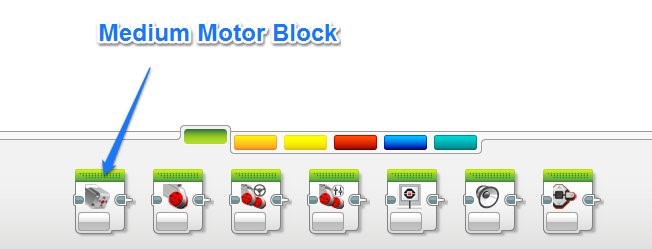
Medium Motor Block
The gripper works by spinning the medium motor. The worm gear that is attached to the axel of the Medium Motor then slowly closes or opens the gripper claws.
To make the gripper open and close, we will use the Medium Motor Block from the Actions palette. Unlike the Move Steering Block, this block will only control a single motor, in our case the Medium Motor. Connect it up to Port D on you EV3 with one of the spare cables

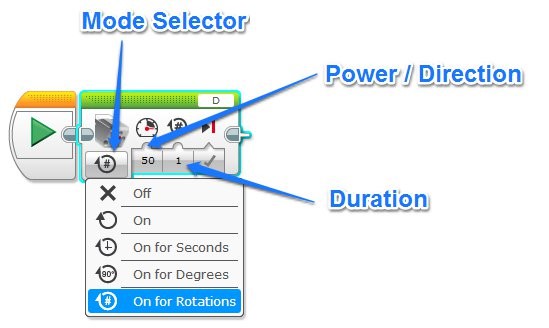
The block is used in a very similar way to the Move Steering Block, with the ability to change the speed, direction and the power level. In the Mode Selector area you can choose one of the following options for your Medium Motor.
- Turn off
- Turn On continuously
- Turn On for a set number of Seconds
- Turn On for a set number of Degrees
- Turn On for a set number of Rotations

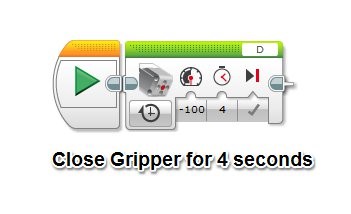
For this particular design, if you apply a positive power to the Medium Motor, the gripper opens. If you apply a negative power, the gripper closes. If you apply power for too long in either direction, the gripper will hit its physical limits and will probably pull itself apart! Be careful J
I found, through careful trial and error (and lots of self-destroyed grippers) that opening and closing of the grippers took around 4 seconds at full power. Take some time with your version to see what works best.

Why Time based?
So why do we choose to open and close the gripper based on a certain number of seconds? Wouldn’t it be easier to calculate a specific number of rotations?
‘On for Seconds’ is often a better choice than either the ‘On for Rotations’ or ‘On for Degrees’ modes as it prevents the program from locking up if the gripper cannot close completely because of an unexpectedly large object to grab. ie. If the gripper motor is programmed to close for 6 rotations, but grabs the object after only 4 rotations (and cannot keep closing), then program will never reach the required 6 rotations and will never be able to move on to the next programming block. The program will be stuck at this particular block.
If the gripper motor is programmed to close for 4 seconds (as in the above example), then even if the object is grabbed after 3 seconds, the program can continue on after the 4 seconds has passed.
What can we do now?
Our first task: Drive up to a can, grab it, turn around, drive somewhere else and open the gripper.

(nb. This will only work if the can is located exactly 4 rotations of the wheels away from the robot. Do lots of testing to get this just right!)
Next challenges
Challenge 1: Somehow attach the Colour Sensor to you robot so it can detect different floor colours. Place the can on a black piece of paper. Program your robot to drive up to the black paper, grab the can and turn around. Then have your robot drive to the edge of the table (hint: colour sensor = ‘no colour’) and drop the can over the edge.
Challenge 2: Build some different types of powered attachments; levers, pom-pom wavers, TV remote control button pusher, light switch turner-on, letterbox opener. Use your imagination!
Good luck!
Dr Damien Kee has been working with robotics in education for over 10 years, teaching thousands of Students and hundreds of Teachers from all over the world. He is the author of the popular “Classroom Activities for the Busy Teacher” series of robotics teacher resource books.
You can find more information at www.damienkee.com or contact him directly at damien@damienkee.com
