damien@damienkee.com

Pi Pico Servo Tutorial – Damien Kee
 Oct 23, 2026

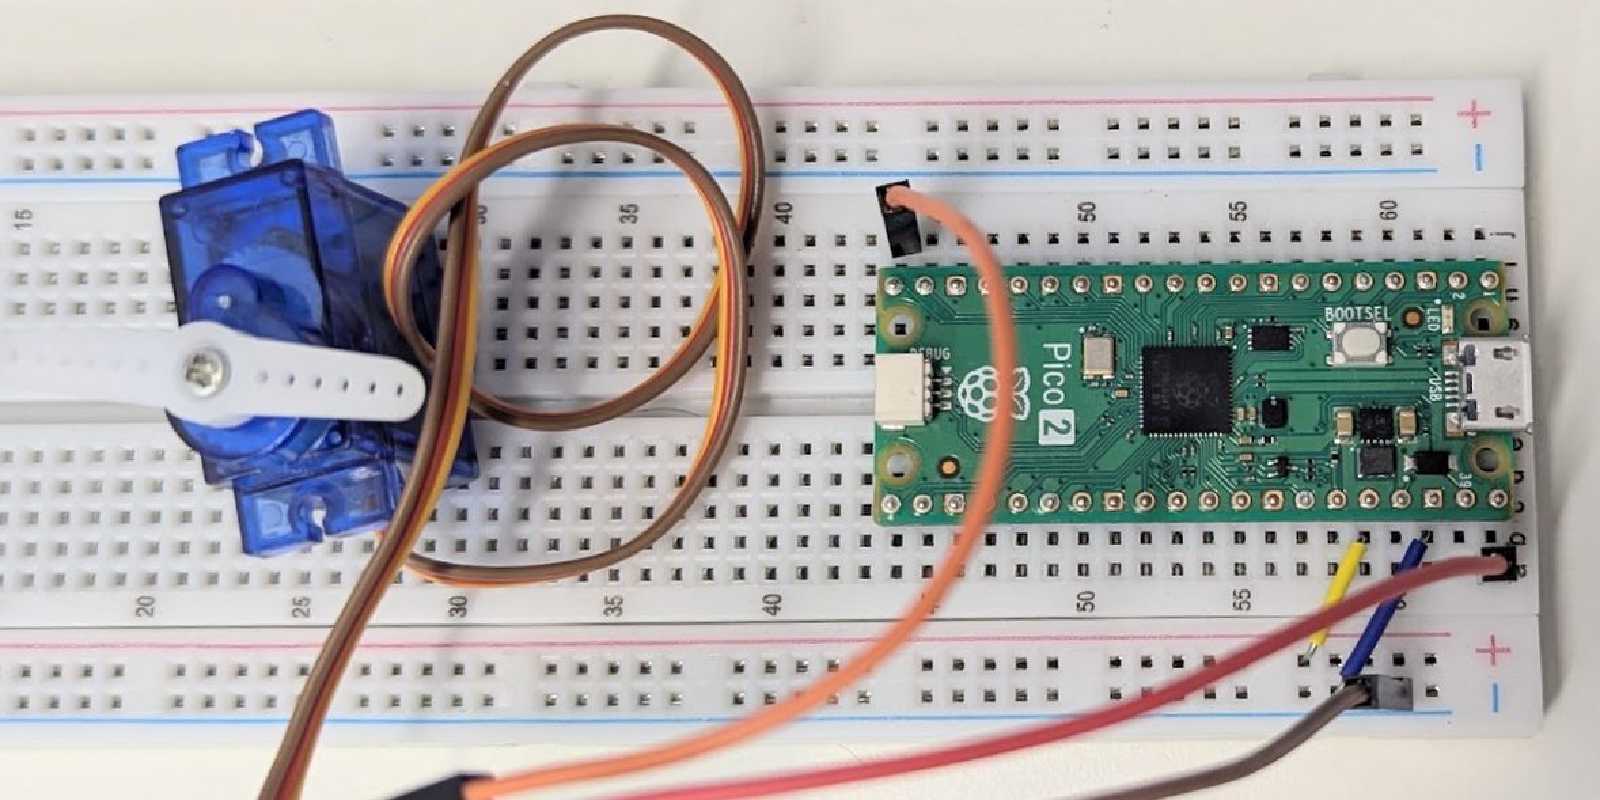
By the end of this tutorial your Pi Pico 2 will be turning a servo motor to any angle you choose, and sweeping it back and forth. Work through each step in order and tick it off as you go. Don’t skip ahead: each part builds on the one before.
What you need
| Item | Notes |
|---|---|
| Raspberry Pi Pico 2 | With header pins soldered on |
| Micro-USB cable | Must be a data cable, not a charge-only cable |
| Computer | Windows, Mac or Linux |
| Micro servo (SG90 or similar) | Small blue or black servo with a 3-wire cable |
| Servo horn | The small plastic arm that comes in the bag with the servo |
| Breadboard | Optional, but makes wiring easier |
| 3 jumper wires | Male-to-male if using a breadboard |
How to read this tutorial
- Each part is broken into small numbered steps. Do one step at a time.
- Text in
this styleis something you type, or the exact name of a menu or button. - Screenshots and photos show what your screen or circuit should look like, so you can check yours matches before moving on.
- A Check at the end of each part tells you what you should see before moving on.
If you’ve already done the Pi Pico OLED tutorial, Thonny and MicroPython are already set up. Check your Pico still works with Part 1C, then skip to Part 3.
Part 1: Set up Thonny to talk to the Pico 2
Thonny is the program you write code in. The Pico needs MicroPython (a small version of Python) installed on it before Thonny can talk to it. You only do this part once per Pico.
1A. Install Thonny
- Go to thonny.org.
- Click the download link for your computer (Windows, Mac or Linux).
- Run the installer and accept the default settings.
- Open Thonny.
- If Thonny asks for your language and initial settings, pick your language and choose
Standard, then clickLet's go!.
1B. Put MicroPython on the Pico
Skip to 1C if your teacher has told you MicroPython is already installed.
- Find the small white button on the Pico labelled
BOOTSEL. - Hold
BOOTSELdown. - While still holding it, plug the USB cable into the Pico, then into the computer.
- Let go of
BOOTSEL. A new drive calledRP2350should appear on the computer, like a USB stick. - In Thonny, click the interpreter label in the bottom-right corner of the window.
- Click
Configure interpreter.... - In the first drop-down, choose
MicroPython (Raspberry Pi Pico). - Click the link
Install or update MicroPythonnear the bottom of the window. - Set the boxes like this (check them against the picture below):
- Target volume:
RP2350(the drive letter after it, such as(E:), may be different on your computer) - MicroPython family:
RP2 - Variant:
Raspberry Pi • Pico 2(it must say Pico 2 and must not say W) - Version: leave as the newest
- Target volume:
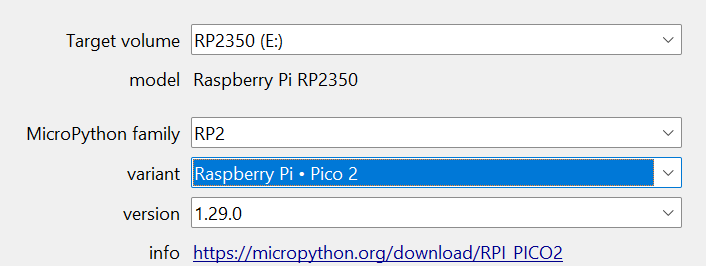
Important: pick the right variant. Each kind of Pico needs its own MicroPython. This tutorial uses the Pico 2, which has
Pico 2printed on the board. A W board (Pico W or Pico 2 W) has a small silver metal box (the Wi-Fi chip) at the end away from the USB port. Choosing the wrong variant causes errors later.
- Click
Installand wait for it to sayDone!. - Click
Close, then clickOKto close the Options window.
1C. Connect Thonny to the Pico
- Make sure the Pico is plugged in (no need to hold
BOOTSELthis time). - Click the interpreter label in the bottom-right corner again.
- Choose
MicroPython (Raspberry Pi Pico)from the list. On some computers it also shows a port name, such asCOM3or/dev/ttyACM0. - Look at the Shell panel at the bottom. It should show a message starting with
MicroPython v1.and ending withRaspberry Pi Pico2 with RP2350, followed by a>>>prompt. - Click next to the
>>>, typeprint("Hello World")and press Enter. The Pico should replyHello World.
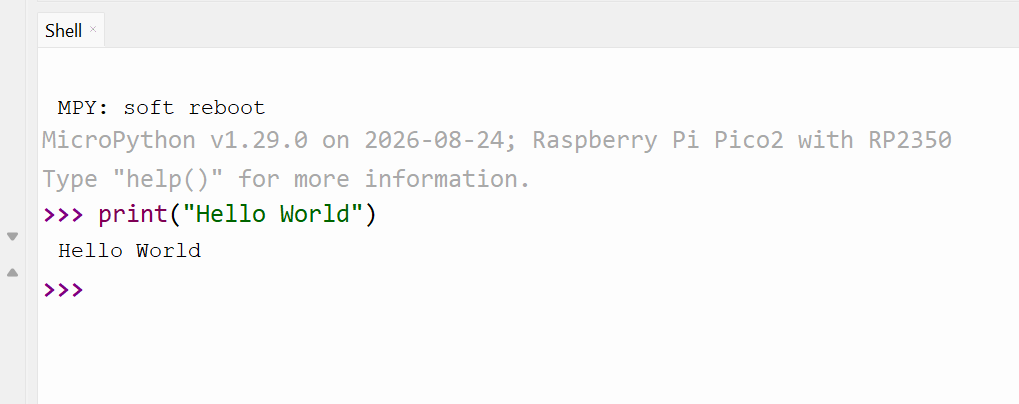
Check: The Shell prints Hello World back to you.
Part 2: Blink the on-board LED
The Pico has a tiny green LED on the board. Making it blink proves your code is reaching the Pico.
2A. Write the program
- Click
File>New(or the white page icon) to open a blank tab. - Type in this code exactly, including the spaces at the start of the indented lines:
from machine import Pin
import time

led = Pin("LED", Pin.OUT)   # the on-board LED

while True:
    led.on()
    time.sleep(0.5)          # wait half a second
    led.off()
    time.sleep(0.5)
2B. Run it
- Click the green
Run current scriptbutton (the play triangle), or pressF5. - Thonny asks where to save. Click
Raspberry Pi Pico. - Name the file
blink.pyand clickOK. - Watch the Pico. The LED next to the USB port should flash on and off every half second.
- If you can’t see a Files panel on the left of Thonny, click
View>Filesto open it. The bottom half shows the files saved on the Pico, includingblink.py.
Error
[CYW43] Failed to start CYW43? Your Pico has a W (Wi-Fi) version of MicroPython, but your board has no Wi-Fi chip. Go back to Part 1B and reinstall MicroPython, choosing theRaspberry Pi • Pico 2variant (no W). Then runblink.pyagain.
2C. Stop it
- Click the red
Stopbutton (or pressCtrl+F2). - The LED stops changing and the
>>>prompt comes back in the Shell.
2D. Try a change
- Change both
0.5values to0.1. - Click
Runagain. The LED should flash much faster.
Check: The LED blinks, and you can start and stop it from Thonny.
Why the program never ends:
while True:means “repeat forever”. Programs on microcontrollers often run forever, so you stop them with the Stop button.
Part 3: How a servo works
A servo is a small motor that turns to an exact angle and holds it there. Most micro servos can turn from 0° to 180° (half a circle). They’re used in robot arms, steering, and anything that needs to point in a set direction.
3A. Get to know your servo
- Look at the servo’s cable. It has 3 wires, usually these colours:
- Brown (sometimes black): GND, the negative power wire
- Red: power, about 5 volts
- Orange (sometimes yellow or white): the signal wire that tells the servo where to turn
- Push the servo horn (the plastic arm) onto the white shaft on top of the servo. It only needs to sit firmly; don’t screw it on yet.
- Gently turn the horn by hand. It should turn about half a circle and then stop. Don’t force it past the stop, because that can strip the plastic gears.
3B. How the Pico tells the servo where to turn
The Pico sends the servo a short pulse of electricity 50 times a second. The length of each pulse sets the angle:
| Pulse length | Angle |
|---|---|
| 0.5 milliseconds | 0° (one end) |
| 1.5 milliseconds | 90° (the middle) |
| 2.5 milliseconds | 180° (the other end) |
A longer pulse means a bigger angle. This kind of signal is called PWM (pulse width modulation). MicroPython has a built-in PWM tool to make it, so you don’t need to install anything extra.
Check: You know which wire is which on your servo.
Part 4: Wire up the servo
The servo needs 3 wires: two for power and one for the signal. It runs on the 5 volts that comes from the USB cable.
4A. Unplug first
- Click
Stopin Thonny. - Unplug the USB cable from the Pico. Always wire with the power off.
4B. Find the pins on the Pico
- Turn the Pico so the USB port points up and the chip faces you.
- Pin 1 is the top-left pin. Pins count down the left side (1 to 20), then up the right side (21 to 40).
- So pin 40 is the top-right pin, and pin 20 is the bottom-left pin.
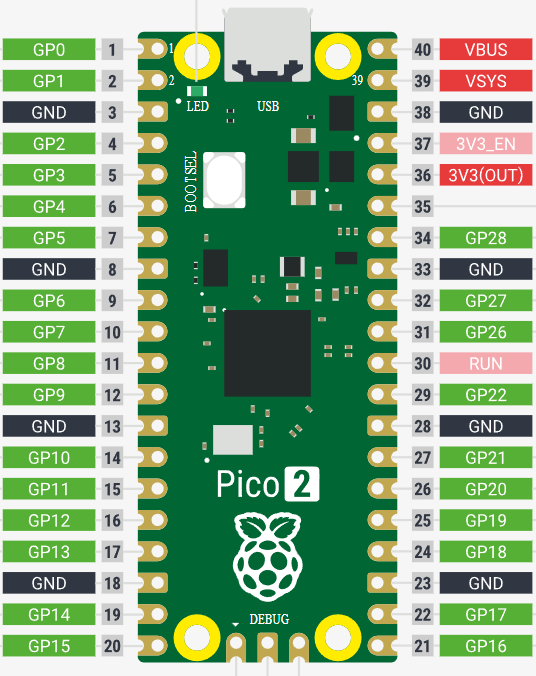
4C. Connect the 3 wires
Connect one wire at a time and tick it off. The servo’s plug has 3 holes, so push a jumper wire into each hole, then connect the other ends to the Pico.
| Done | Servo wire | Pico pin | Pico pin name |
|---|---|---|---|
| [ ] | Brown (GND) | Pin 38 | GND |
| [ ] | Red (power) | Pin 40 | VBUS (5V from USB) |
| [ ] | Orange (signal) | Pin 20 | GP15 |
Why pin 40 and not 3V3? Servos need about 5 volts. Pin 40 (VBUS) gives 5 volts straight from the USB cable. The 3V3 pin doesn’t give enough voltage, and a servo can draw more current than it can safely supply.
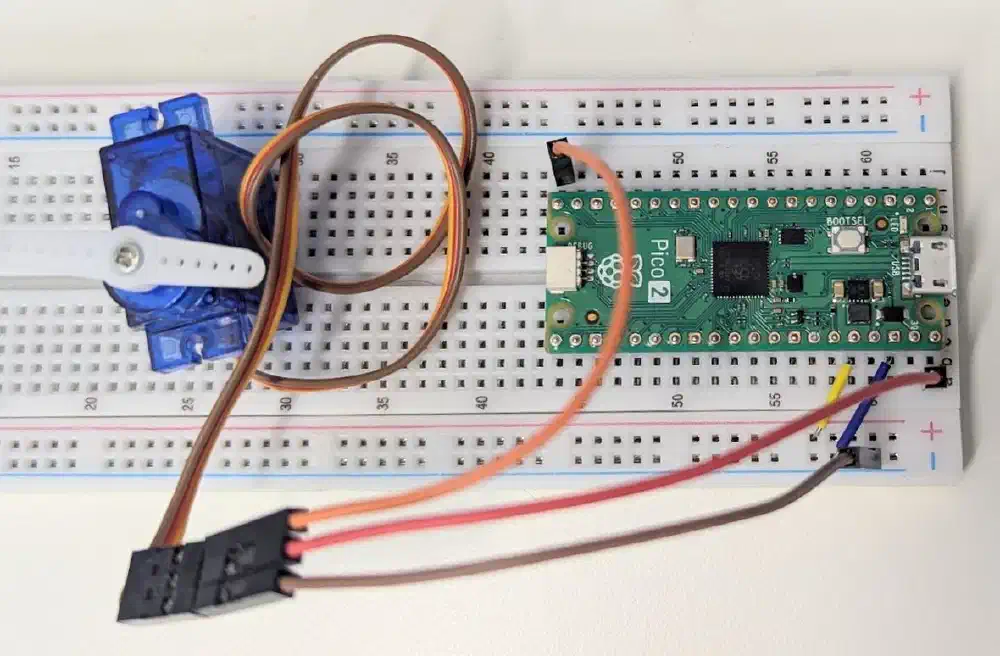
Note about the photo: here the brown wire goes to the breadboard’s blue (−) rail, and a short wire links that rail to a GND pin on the Pico. That works just as well as plugging brown straight into pin 38. If you use the rail, make sure a wire connects it to a GND pin, or the servo won’t work.
4D. Double-check before powering up
- Red goes to pin 40 (VBUS).
- Brown goes to a GND pin.
- Orange goes to pin 20 (GP15).
- No bare wire ends are touching each other.
4E. Power up
- Plug the USB cable back in.
- In Thonny, click
Stoponce to reconnect if the Shell doesn’t show>>>.
Check: The Shell shows >>>. The servo won’t move yet. That’s normal, because it needs a program to tell it where to turn.
Part 5: First move: three positions
Your first servo program moves the arm to one end, the middle, and the other end.
5A. Write the program
- Click
File>Newto open a blank tab. - Type in this code:
from machine import Pin, PWM
import time

# Set up the servo on GP15
servo = PWM(Pin(15))
servo.freq(50)               # 50 pulses every second

servo.duty_ns(500000)        # 0.5 ms pulse = 0 degrees
time.sleep(1)

servo.duty_ns(1500000)       # 1.5 ms pulse = 90 degrees (middle)
time.sleep(1)

servo.duty_ns(2500000)       # 2.5 ms pulse = 180 degrees
time.sleep(1)

servo.duty_ns(1500000)       # back to the middle
What’s
duty_ns? It sets how long each pulse lasts, in nanoseconds (billionths of a second). 1 millisecond is 1,000,000 nanoseconds, so 0.5 ms is500000.
5B. Run it
- Click
Run(or pressF5). - Save it to the
Raspberry Pi Picoasservo_test.py. - Watch the servo. It should turn to one end, then the middle, then the other end, then back to the middle, about one second apart.
5C. Straighten the arm
The program finishes with the servo in the middle (90°), so now is a good time to line up the horn.
- Leave the Pico plugged in so the servo holds its position.
- Pull the horn straight up off the shaft.
- Push it back on so the arm points straight out from the servo, in the direction you want “middle” to be.
- Run
servo_test.pyagain. The arm should now swing evenly either side of the middle.
5D. Try a change
- Change
2500000to2000000and run it again. The servo doesn’t turn as far. - Change it back to
2500000.
Check: The servo turns to both ends and the middle, and stops in the middle.
Part 6: Turn to any angle
Working out pulse lengths every time is a pain. In this part you write a function, a short piece of code you can call by name, that turns an angle (0 to 180) into the right pulse length for you.
6A. Open the demo
- Click
File>New. - Copy in the code below.
# Servo demo for the Pi Pico 2
# Wiring: brown -> GND (pin 38), red -> VBUS (pin 40), orange -> GP15 (pin 20)

from machine import Pin, PWM
import time

# --- Set up the servo ---
servo = PWM(Pin(15))
servo.freq(50)

# --- Our function: turn the servo to an angle from 0 to 180 ---
def set_angle(angle):
    angle = max(0, min(180, angle))           # keep the angle between 0 and 180
    pulse = 500000 + angle * 2000000 // 180   # 0 deg = 0.5 ms, 180 deg = 2.5 ms
    servo.duty_ns(pulse)

# --- Step through some angles ---
for angle in [0, 45, 90, 135, 180]:
    print("Turning to", angle, "degrees")
    set_angle(angle)
    time.sleep(1)

# --- Sweep smoothly back and forth 3 times ---
print("Sweeping...")
for i in range(3):
    for angle in range(0, 181, 2):         # 0 up to 180, in steps of 2
        set_angle(angle)
        time.sleep(0.02)
    for angle in range(180, -1, -2):       # 180 back down to 0
        set_angle(angle)
        time.sleep(0.02)

# --- Finish in the middle, then switch the signal off ---
set_angle(90)
time.sleep(0.5)
servo.deinit()
print("Done!")
6B. Run it
- Click
Run. - Save it to the
Raspberry Pi Picoasservo_demo.py. - Watch the servo and the Shell. You should see:
- Five steps (0°, 45°, 90°, 135°, 180°), one second each, with each angle printed in the Shell
- Three smooth sweeps from one end to the other and back
- The servo stopping in the middle, then
Done!in the Shell
6C. How it works
def set_angle(angle):creates the function. Every line indented under it is part of the function.set_angle(45)calls the function, which runs those lines withangleset to 45.- The pulse maths: 0° needs 500000 ns, and every extra degree adds 2000000 ÷ 180 (about 11111) ns. So 90° gives 500000 + 1000000 = 1500000, the middle.
servo.deinit()switches the signal off. The servo goes loose and stops making noise. Without it, the servo keeps holding its position.- The sweep speed comes from
time.sleep(0.02)and the step size of2. Smaller steps or longer sleeps make it slower and smoother.
6D. Challenges
- Make the sweep twice as slow.
- Make the servo point to 30°, 60° and 120°, then stop.
- Make it wave like a windscreen wiper between 45° and 135°, forever.
- Use
input()to type an angle into the Shell and have the servo turn to it.
6E. Optional: run automatically without a computer
A Pico runs a file called main.py by itself as soon as it gets power.
- Click
File>Save as.... - Choose
Raspberry Pi Pico. - Name it
main.pyand clickOK. - Unplug the Pico, then plug it into a USB power bank or phone charger. The demo starts by itself.
Only one file can be called main.py, so saving a new program with that name replaces the old one. To stop it running automatically, delete or rename main.py on the Pico using the Files panel.
Check: The servo steps through five angles, sweeps three times, and stops in the middle. Well done!
Troubleshooting
| Problem | What to try |
|---|---|
No RP2350 drive appears (Part 1B) | Try a different USB cable; many are charge-only. Hold BOOTSEL the whole time you plug in. |
Shell says Device is busy or could not connect | Click Stop. If that fails, unplug the Pico, wait 3 seconds, plug it back in, then click Stop. |
| Pico isn’t in the interpreter list | MicroPython isn’t installed yet (redo Part 1B), or the cable is charge-only. |
[CYW43] Failed to start CYW43 | Wrong MicroPython variant. Redo Part 1B and choose Raspberry Pi • Pico 2. |
| Servo doesn’t move at all | Check the orange wire is on pin 20 (GP15) and red is on pin 40 (VBUS), not 3V3. |
| Servo twitches or the Pico disconnects when it moves | The servo is drawing too much power. Plug the USB cable straight into the computer (not a hub), and make sure the arm isn’t blocked. |
| Servo buzzes or strains at 0° or 180° | Some servos can’t reach the full range. Change 500000 to 600000 and 2000000 to 1800000 in set_angle. |
| Servo keeps humming after the program ends | It’s holding its position. Add servo.deinit() at the end to switch the signal off. |
| Arm isn’t centred at 90° | Redo Part 5C to straighten the horn. |
SyntaxError or IndentationError | Check the code against the tutorial, especially the spaces at the start of indented lines. |
Cheat sheet
Every servo program starts with this setup:
from machine import Pin, PWM
import time

servo = PWM(Pin(15))
servo.freq(50)

def set_angle(angle):
    angle = max(0, min(180, angle))
    pulse = 500000 + angle * 2000000 // 180
    servo.duty_ns(pulse)
| Command | What it does |
|---|---|
set_angle(90) | Turns the servo to 90° (use any angle from 0 to 180) |
servo.duty_ns(1500000) | Sends a 1.5 ms pulse directly (same as 90°) |
time.sleep(1) | Waits 1 second, giving the servo time to move |
servo.deinit() | Switches the signal off; the servo goes loose |
Handy numbers
- 0° =
500000ns, 90° =1500000ns, 180° =2500000ns. - A micro servo takes roughly 0.3 seconds to turn from one end to the other, so give it time with
time.sleep(). - Wiring: brown → GND (pin 38), red → VBUS (pin 40), orange → GP15 (pin 20).