damien@damienkee.com

Pi Pico OLED Tutorial – Damien Kee
 Oct 22, 2026

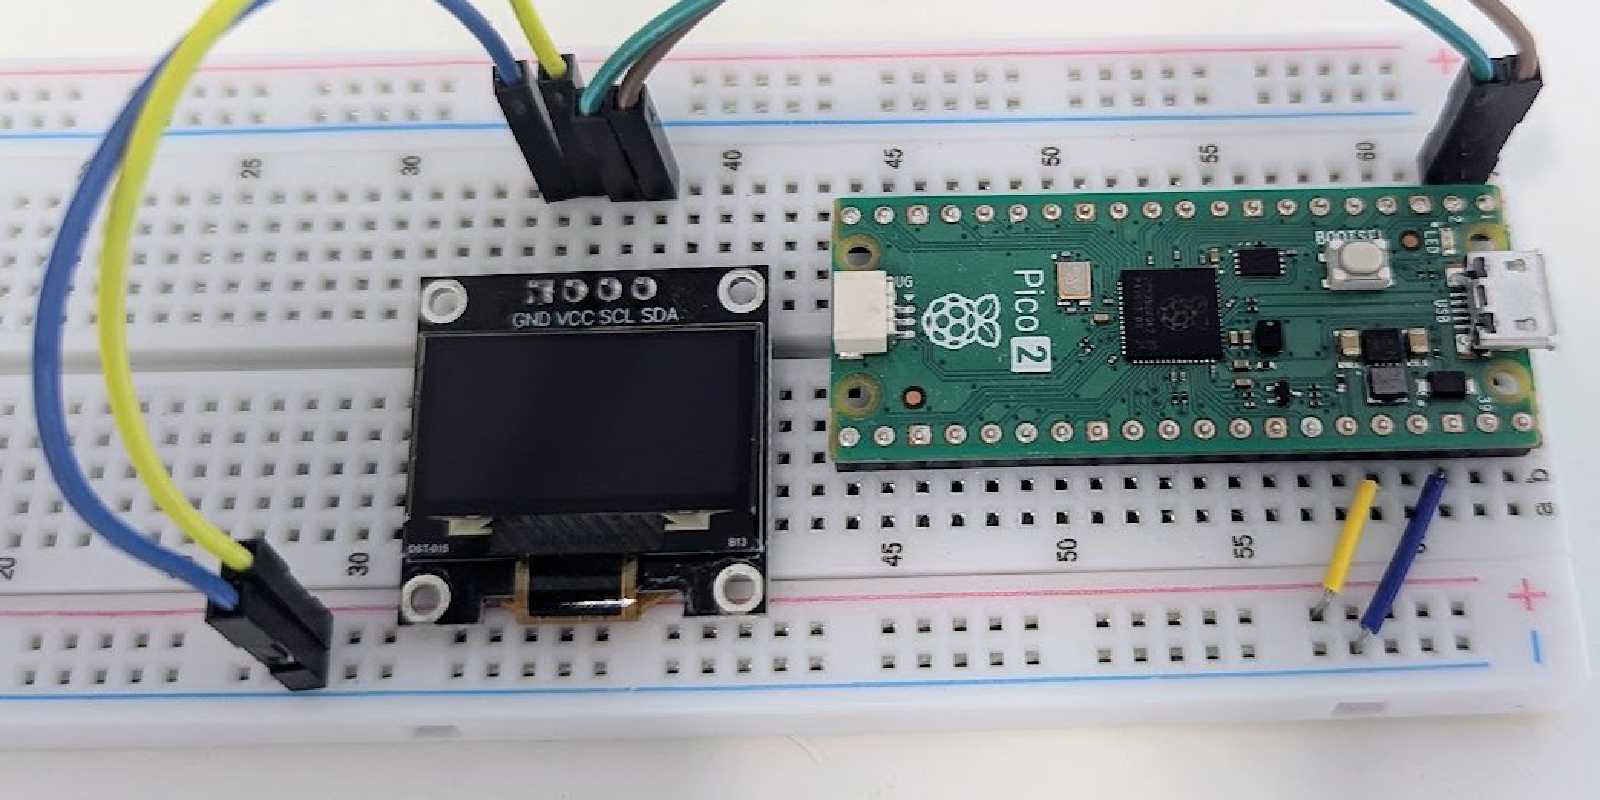
By the end of this tutorial your Pi Pico will be showing text, shapes and a moving progress bar on a small OLED screen. Work through each step in order and tick it off as you go. Don’t skip ahead: each part builds on the one before.
What you need
| Item | Notes |
|---|---|
| Raspberry Pi Pico 2 | With header pins soldered on |
| Micro-USB cable | Must be a data cable, not a charge-only cable |
| Computer | Windows, Mac or Linux |
| 0.96" OLED display | 128 x 64 pixels, I2C, 4 pins labelled GND, VCC, SCL, SDA |
| Breadboard | Optional, but makes wiring easier |
| 4 jumper wires | Ideally 4 different colours |
How to read this tutorial
- Each part is broken into small numbered steps. Do one step at a time.
- Text in
this styleis something you type, or the exact name of a menu or button. - Screenshots and photos show what your screen or circuit should look like, so you can check yours matches before moving on.
- A Check at the end of each part tells you what you should see before moving on.
Part 1: Set up Thonny to talk to the Pico
Thonny is the program you write code in. The Pico needs MicroPython (a small version of Python) installed on it before Thonny can talk to it. You only do this part once per Pico.
1A. Install Thonny
- Go to thonny.org.
- Click the download link for your computer (Windows, Mac or Linux).
- Run the installer and accept the default settings.
- Open Thonny.
- If Thonny asks for your language and initial settings, pick your language and choose
Standard, then clickLet's go!.
1B. Put MicroPython on the Pico
Skip to 1C if your teacher has told you MicroPython is already installed.
- Find the small white button on the Pico labelled
BOOTSEL. - Hold
BOOTSELdown. - While still holding it, plug the USB cable into the Pico, then into the computer.
- Let go of
BOOTSEL. A new drive calledRP2350should appear on the computer, like a USB stick. (On an older Pico 1 it’s calledRPI-RP2.)
- In Thonny, click the interpreter label in the bottom-right corner of the window.
- Click
Configure interpreter.... - In the first drop-down, choose
MicroPython (Raspberry Pi Pico).
- Click the link
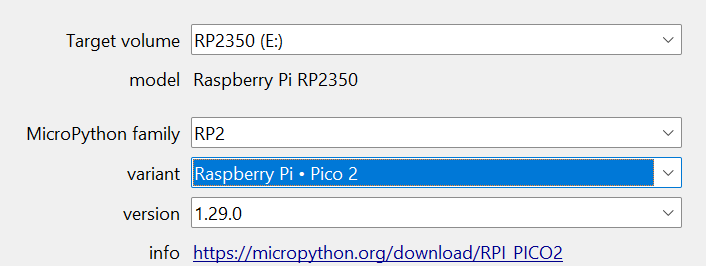
Install or update MicroPythonnear the bottom of the window. - Set the boxes like this (check them against the picture below):
- Target volume:
RP2350(the drive letter after it, such as(E:), may be different on your computer) - MicroPython family:
RP2 - Variant:
Raspberry Pi • Pico 2(it must say Pico 2 and must not say W) - Version: leave as the newest
- Target volume:
Important: pick the right variant. Each kind of Pico needs its own MicroPython. This tutorial uses the Pico 2, which has
Pico 2printed on the board. A W board (Pico W or Pico 2 W) has a small silver metal box (the Wi-Fi chip) at the end away from the USB port. Choosing the wrong variant causes errors later.
- Click
Installand wait for it to sayDone!. - Click
Close, then clickOKto close the Options window.
1C. Connect Thonny to the Pico
- Make sure the Pico is plugged in (no need to hold
BOOTSELthis time). - Click the interpreter label in the bottom-right corner again.
- Choose
MicroPython (Raspberry Pi Pico)from the list. On some computers it also shows a port name, such asCOM3or/dev/ttyACM0.
- Look at the Shell panel at the bottom. It should show a message starting with
MicroPython v1.and ending withRaspberry Pi Pico2 with RP2350, followed by a>>>prompt. - Click next to the
>>>, typeprint("Hello World")and press Enter. The Pico should replyHello World.
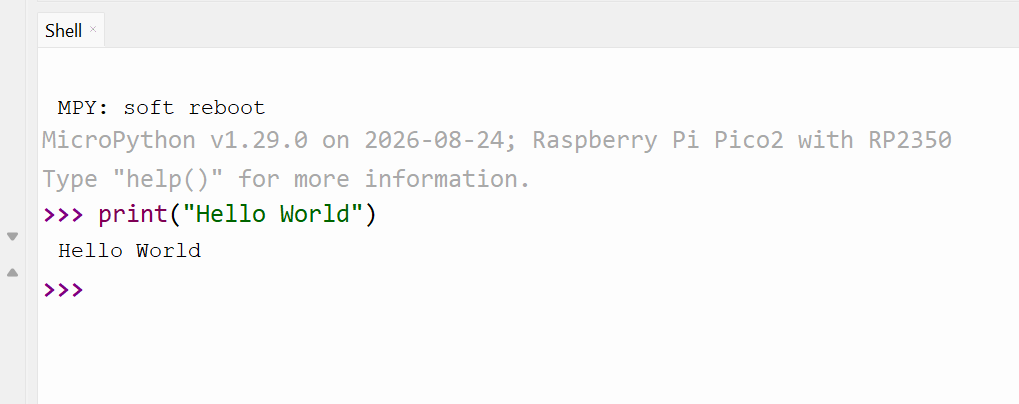
Check: The Shell prints Hello World back to you.
Part 2: Blink the on-board LED
The Pico has a tiny green LED on the board. Making it blink proves your code is reaching the Pico.
2A. Write the program
- Click
File>New(or the white page icon) to open a blank tab. - Type in this code exactly, including the spaces at the start of the indented lines:
from machine import Pin
import time

led = Pin("LED", Pin.OUT)   # the on-board LED

while True:
    led.on()
    time.sleep(0.5)          # wait half a second
    led.off()
    time.sleep(0.5)
2B. Run it
- Click the green
Run current scriptbutton (the play triangle), or pressF5. - Thonny asks where to save. Click
Raspberry Pi Pico.
- Name the file
blink.pyand clickOK. - Watch the Pico. The LED next to the USB port should flash on and off every half second.
Error
[CYW43] Failed to start CYW43? Your Pico has a W (Wi-Fi) version of MicroPython, but your board has no Wi-Fi chip. Go back to Part 1B and reinstall MicroPython, choosing theRaspberry Pi Pico 2variant (no W). Then runblink.pyagain.
- If you can’t see a Files panel on the left of Thonny, click
View>Filesto open it. The bottom half shows the files saved on the Pico, includingblink.py.
2C. Stop it
- Click the red
Stopbutton (or pressCtrl+F2). - The LED stops changing and the
>>>prompt comes back in the Shell.
2D. Try a change
- Change both
0.5values to0.1. - Click
Runagain. The LED should flash much faster.
Check: The LED blinks, and you can start and stop it from Thonny.
Why the program never ends:
while True:means “repeat forever”. Programs on microcontrollers often run forever, so you stop them with the Stop button.
Part 3: Install the ssd1306 library
A library is code someone else wrote that you can use. The ssd1306 library knows how to talk to the OLED, so you don’t have to. It gets saved onto the Pico, so you only install it once per Pico.
3A. Install with the package manager
- Make sure the Pico is plugged in and connected (you see
>>>in the Shell). - Click the red
Stopbutton so nothing is running. - Click
Tools>Manage packages....
- In the search box, type
ssd1306. - Click
Search micropython-lib and PyPI.
- Click the result called
ssd1306. If you see more than one, choose the one from micropython-lib. - Click
Install. - Wait until the install finishes. The page should now show Installed version and Installed to: /lib, like the picture below.
- Click
Close.
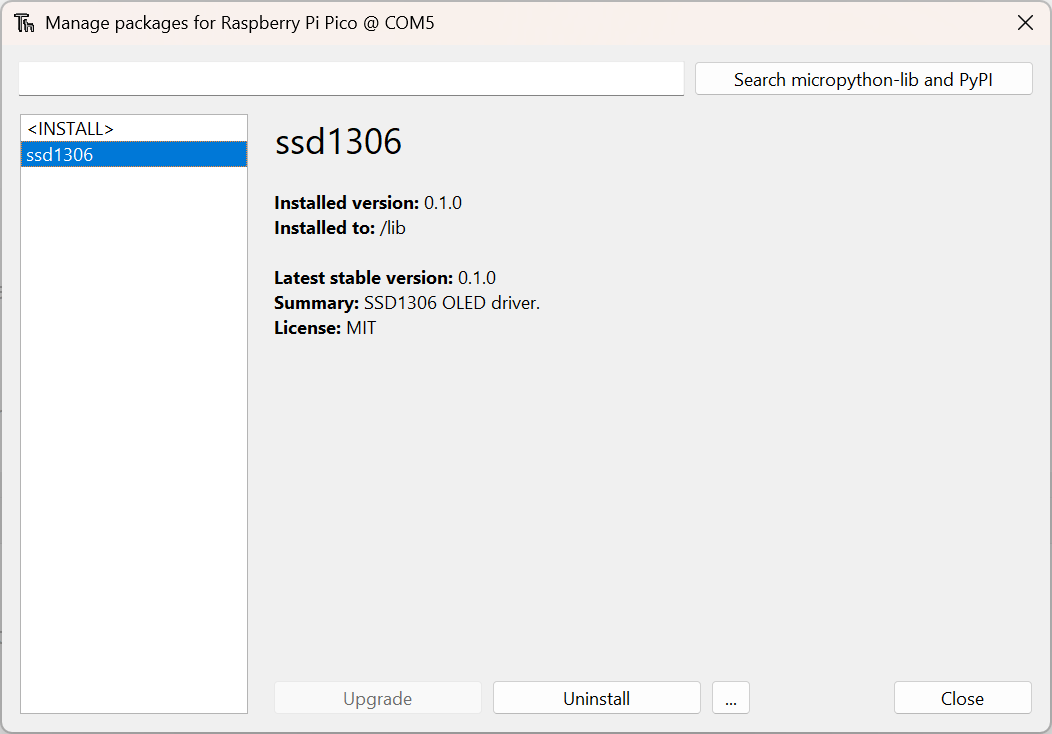
3B. Check it installed
- In the Files panel, look in the Raspberry Pi Pico section.
- You should see a folder called
lib. Click the+next to it to open it. - Inside should be
ssd1306.pyand a folder calledssd1306-0.1.0.dist-info(the numbers may be different). Leave both of them there.
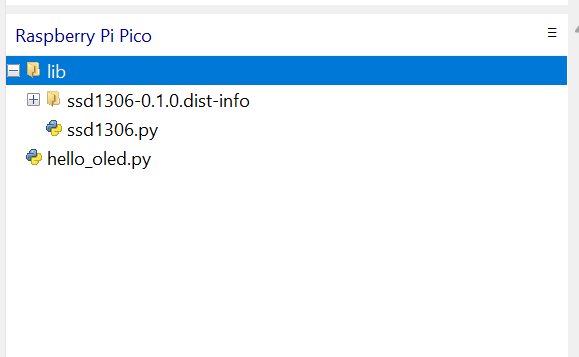
- In the Shell, type
import ssd1306and press Enter. - If nothing happens and you get a new
>>>, it worked. An error such asImportError: no module named 'ssd1306'means it didn’t install.
3C. Backup method (only if 3A didn’t work)
Some school networks block the package manager. Your teacher may give you the file ssd1306.py instead.
- In the top half of the Files panel (This computer), find where you saved
ssd1306.py. - Right-click
ssd1306.py. - Click
Upload to /. - Check it now appears in the Raspberry Pi Pico section.
Check: Typing import ssd1306 in the Shell gives no error.
Part 4: Wire up the OLED
The OLED needs only 4 wires: two for power and two for data. The data connection is called I2C: SDA carries the data and SCL carries a timing signal (the clock).
4A. Unplug first
- Click
Stopin Thonny. - Unplug the USB cable from the Pico. Always wire with the power off.
4B. Find the pins on the Pico
- Turn the Pico so the USB port points up and the chip faces you.
- Pin 1 is the top-left pin. Pins count down the left side (1 to 20), then up the right side (21 to 40).
- So pin 40 is the top-right pin, and pin 2 is just below pin 1.
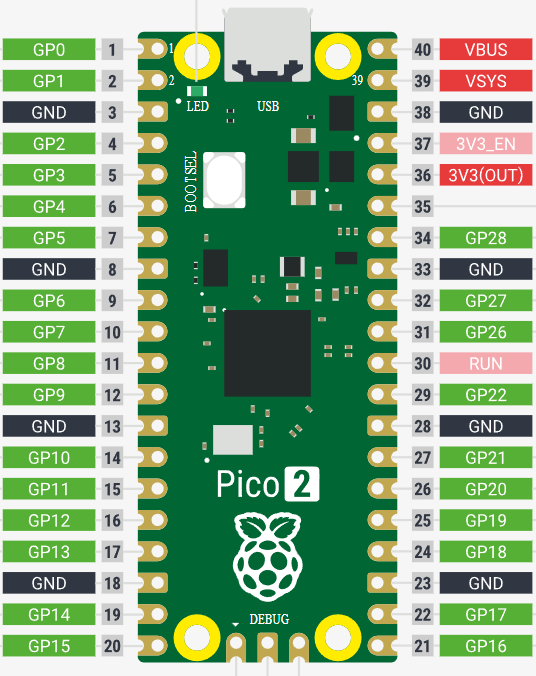
4C. Connect the 4 wires
Connect one wire at a time and tick it off. Careful: on the OLED the order is GND, VCC, SCL, SDA, which is easy to mix up.
Pin names can vary. On some OLED boards the
SCLpin is labelledSCKinstead. They mean the same thing (the clock), so connectSCKwherever this tutorial saysSCL. Some boards also put the pins in a different order, so always go by the labels printed on your board.
| Done | OLED pin | Pico pin | Pico pin name | Suggested wire colour |
|---|---|---|---|---|
| [ ] | GND | Pin 38 | GND | Black |
| [ ] | VCC | Pin 36 | 3V3(OUT) | Red |
| [ ] | SCL | Pin 2 | GP1 | Yellow |
| [ ] | SDA | Pin 1 | GP0 | Blue |
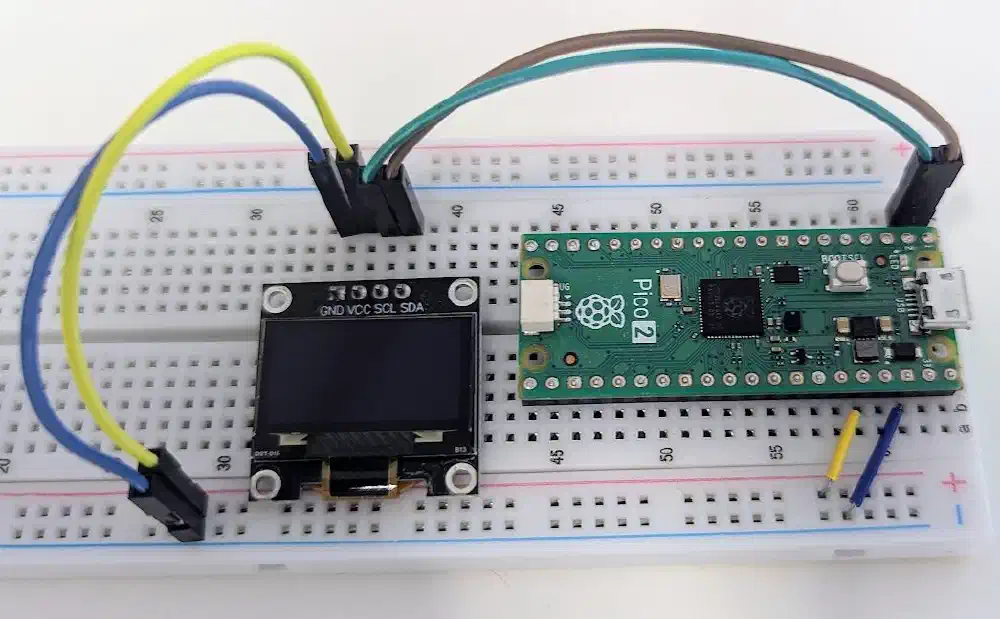
4D. Double-check before powering up
- VCC goes to pin 36 (3V3), not pin 40 or pin 39.
- GND goes to a GND pin.
- SDA goes to GP0 and SCL goes to GP1 (not swapped).
- No bare wire ends are touching each other.
4E. Power up
- Plug the USB cable back in.
- In Thonny, click
Stoponce to reconnect if the Shell doesn’t show>>>.
Check: The Shell shows >>>. The OLED will stay blank for now. That’s normal, because it needs a program to tell it what to show.
Part 5: Hello World on the OLED
Now for your first OLED program. It sets up the screen, writes some text, and shows it.
5A. Check the Pico can see the OLED
- In the Shell, type these two lines, pressing Enter after each:
from machine import Pin, I2C
I2C(0, sda=Pin(0), scl=Pin(1)).scan()
- You should see
[60]. That’s the OLED’s address (60 is the same as0x3C). - If you see
[61], write that down. Your OLED uses address0x3D(see Troubleshooting). - If you see
[](empty), the Pico can’t find the OLED. Unplug and check your wiring against Part 4.
5B. Write the program
- Click
File>Newto open a blank tab. - Type in this code:
from machine import Pin, I2C
import ssd1306

# Set up the screen
i2c = I2C(0, sda=Pin(0), scl=Pin(1))
oled = ssd1306.SSD1306_I2C(128, 64, i2c)

oled.fill(0)                    # clear the screen (0 = black)
oled.text("Hello World!", 0, 0) # text at x=0, y=0 (top-left)
oled.text("My name is...", 0, 20)
oled.show()                     # send it to the screen
5C. Run it
- Click
Run(or pressF5). - Save it to the
Raspberry Pi Picoashello_oled.py. - Look at the OLED. You should see
Hello World!at the top.
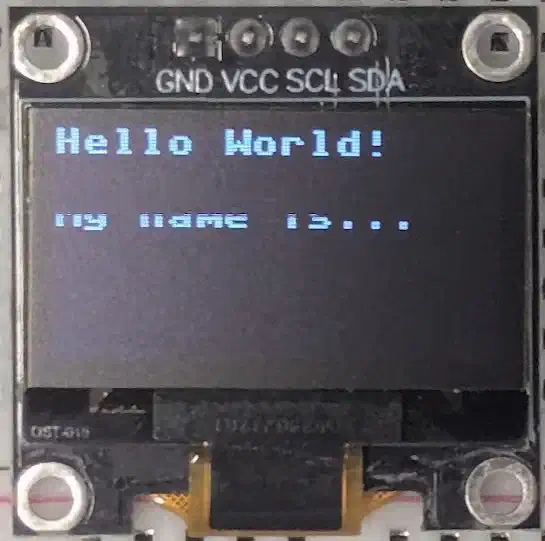
Taking a photo of your OLED? The screen redraws itself many times a second, one row at a time. Your eyes see the whole picture, but a phone camera is fast enough to catch it part-way through, so some text can look cut off in the photo (like “My name is…” above). It’s not a fault. Keep this in mind when you take photos for your documentation: take a few shots, or try dimmer light, and keep the best one.
5D. Make it yours
- Change
My name is...to your own name. - Run it again.
- Try changing the
20to40. Your name moves further down the screen. - Now delete the line
oled.show()and run it again. What happens? Put the line back.
5E. How it works
- The screen is 128 pixels wide (x: 0 to 127) and 64 pixels tall (y: 0 to 63).
- (0, 0) is the top-left corner. Bigger x goes right; bigger y goes down.
- Each letter is 8 x 8 pixels, so 16 letters fit across and 8 lines fit down.
- Drawing commands like
text()draw in the Pico’s memory. Nothing appears until you calloled.show(). That’s why the screen stayed the same in step 5D.4.
Check: Your name appears on the OLED.
Part 6: Run the OLED demo program
The demo shows off the main things the OLED can do: text, lines, boxes, circles and a moving progress bar.
6A. Open the demo
- Click
File>New. - Copy in the code below (or open the
main.pyfile your teacher gave you).
# OLED demo using the standard ssd1306 library
# Wiring: SDA -> GP0 (pin 1), SCL -> GP1 (pin 2), VCC -> 3V3 (pin 36), GND -> GND
# Screen: x = 0 to 127 (left to right), y = 0 to 63 (top to bottom)
# Text is 8 x 8 pixels, so 16 characters across and 8 lines down

from machine import Pin, I2C
import ssd1306
import time

# --- Set up the screen ---
i2c = I2C(0, sda=Pin(0), scl=Pin(1))
oled = ssd1306.SSD1306_I2C(128, 64, i2c)

# --- Text ---
oled.fill(0)                          # clear the screen
oled.text("Hello, Pico!", 16, 0)      # x = 16 centres 12 characters
oled.text("Line 2 text", 0, 16)       # y = 16 is text line 2
oled.text("Temp: " + str(23.5) + " C", 0, 32)
oled.show()                           # put it on the screen
time.sleep(3)

# --- Shapes ---
oled.fill(0)
oled.rect(0, 0, 128, 64, 1)           # border round the screen
oled.line(0, 0, 127, 63, 1)           # diagonal line
oled.ellipse(64, 32, 20, 20, 1)       # circle in the middle
oled.fill_rect(90, 10, 20, 15, 1)     # solid box
oled.show()
time.sleep(3)

# --- Counter with a progress bar ---
for i in range(101):
    oled.fill(0)
    oled.text("Counting...", 20, 8)
    oled.text(str(i) + "%", 52, 32)
    oled.rect(0, 52, 128, 10, 1)              # bar outline
    oled.fill_rect(2, 54, int(i * 1.24), 6, 1)  # bar fill (124 px when full)
    oled.show()
    time.sleep(0.05)

oled.fill_rect(0, 8, 128, 8, 0)       # wipe just the "Counting..." line
oled.text("Done!", 44, 8)
oled.show()
6B. Run it
- Click
Run. - Save it to the
Raspberry Pi Picoasoled_demo.py. - Watch the OLED. You should see three screens in a row:
- Text for 3 seconds
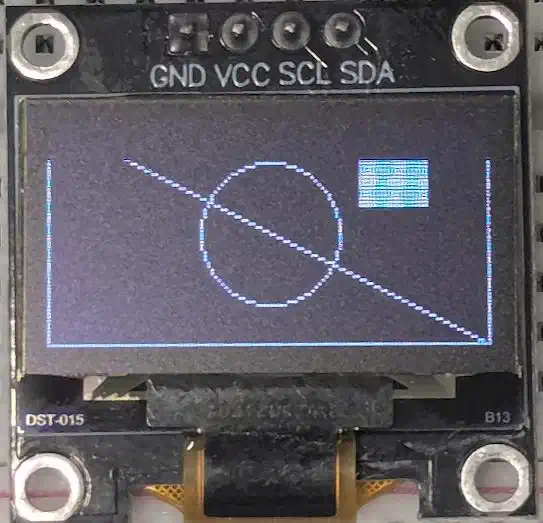
- Shapes (a border, a diagonal line, a circle and a solid box) for 3 seconds
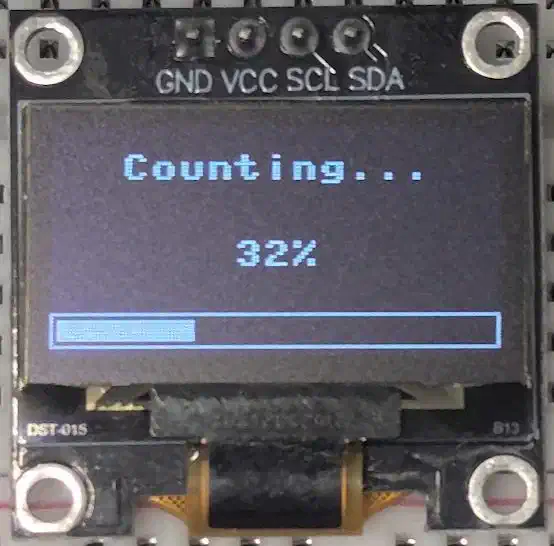
- A progress bar counting from 0% to 100%, then
Done!
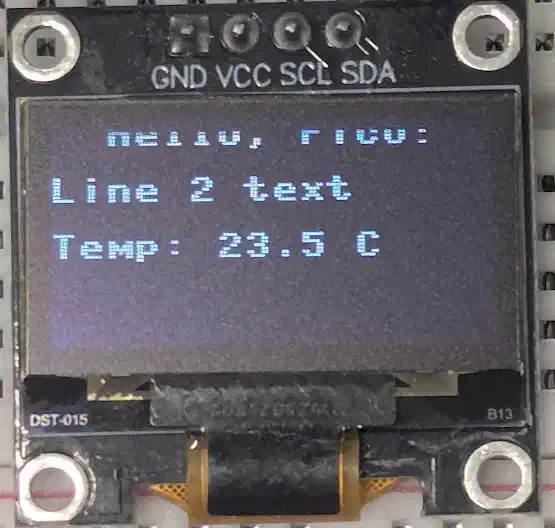
Some text in these photos looks cut off. That’s just the camera catching the screen while it redraws (see the note in Part 5C). On the real screen everything shows in full.
6C. Understand the pattern
Look at the counter loop. Every time round it does three things:
- Clear the screen:
oled.fill(0) - Draw everything:
text(),rect(),fill_rect() - Show it:
oled.show()
Clear, draw, show. Use this pattern for anything that changes, like sensor readings or a game.
6D. Challenges
- Change the demo text to say something about you.
- Move the circle to the top-left corner.
- Make the progress bar count down from 100 to 0.
- Draw a smiley face using
ellipse()andpixel().
6E. Optional: run automatically without a computer
A Pico runs a file called main.py by itself as soon as it gets power.
- Click
File>Save as.... - Choose
Raspberry Pi Pico. - Name it
main.pyand clickOK. - Unplug the Pico, then plug it into a USB power bank or phone charger. The demo starts by itself.
To stop it running automatically, delete or rename main.py on the Pico using the Files panel.
Check: You’ve seen all three demo screens. Well done!
Troubleshooting
| Problem | What to try |
|---|---|
No RP2350 drive appears (Part 1B) | Try a different USB cable; many are charge-only. Hold BOOTSEL the whole time you plug in. |
Shell says Device is busy or could not connect | Click Stop. If that fails, unplug the Pico, wait 3 seconds, plug it back in, then click Stop. |
| Pico isn’t in the interpreter list | MicroPython isn’t installed yet (redo Part 1B), or the cable is charge-only. |
ImportError: no module named 'ssd1306' | The library isn’t on the Pico. Redo Part 3. |
OSError: [Errno 5] EIO or ENODEV | The Pico can’t talk to the OLED. Check SDA and SCL aren’t swapped, and all 4 wires are firmly in. |
Scan shows [61] instead of [60] | Change the setup line to oled = ssd1306.SSD1306_I2C(128, 64, i2c, addr=0x3D) |
| Program runs with no error but screen stays blank | Check you have oled.show() after drawing. |
| Image is upside down | Add oled.rotate(0) after the setup line. |
AttributeError on ellipse | Your MicroPython is old. Redo Part 1B to update it. |
| Top of the screen is yellow, the rest blue | Normal: some OLEDs have a yellow strip across the top 16 pixels. |
Cheat sheet
Every program starts with this setup:
from machine import Pin, I2C
import ssd1306

i2c = I2C(0, sda=Pin(0), scl=Pin(1))
oled = ssd1306.SSD1306_I2C(128, 64, i2c)
In the commands below, the last number 1 means white (pixel on) and 0 means black (pixel off).
| Command | What it does |
|---|---|
oled.show() | Puts everything you’ve drawn on the screen |
oled.fill(0) | Clears the screen to black |
oled.fill(1) | Turns the whole screen white |
oled.text("Hi", x, y) | Writes text with its top-left corner at x, y |
oled.pixel(x, y, 1) | Turns on one pixel |
oled.line(x1, y1, x2, y2, 1) | Draws a line between two points |
oled.hline(x, y, width, 1) | Draws a horizontal line |
oled.vline(x, y, height, 1) | Draws a vertical line |
oled.rect(x, y, width, height, 1) | Draws a box outline |
oled.fill_rect(x, y, width, height, 1) | Draws a solid box |
oled.ellipse(x, y, r, r, 1) | Draws a circle with centre x, y and radius r |
oled.ellipse(x, y, r, r, 1, True) | Draws a solid circle |
oled.contrast(0 to 255) | Sets the brightness |
oled.invert(1) | Swaps black and white (0 swaps back) |
oled.poweroff() / oled.poweron() | Turns the screen off / on |
Handy numbers
- Screen: 128 x 64 pixels. (0, 0) is top-left.
- Text lines start at y = 0, 8, 16, 24, 32, 40, 48, 56.
- To centre text:
x = (128 - len(text) * 8) // 2