
This article first appeared in BrickJournal Issue 28, 2014
One of the most important commands we can give a robot, especially a moving robot, are commands that tell the motors what to do. This article will show you how to build a simple robot and get it moving accurately.
The Robot
The great thing about LEGO is that you can build just about anything you can imagine. This is great when we have unlimited LEGO and all the time in the world, but often (especially in classroom situations) we have some pretty restrictive conditions. This article uses my popular RileyRover Base. It can be built from a standard LEGO Education EV3 Core set and should take no more than 15 minutes to put together. You can also use the EV3 Home edition, but you might have to flex your problem solving skills to get around the slightly different arrangement of parts.
I’m the first to admit it is not the strongest robot design out there, but it is quick to build and uses very few parts, meaning you can get on to the programming a lot quicker!
You can find the Building Instructions for the RileyRover and additional attachments from www.damienkee.com.
The Programming
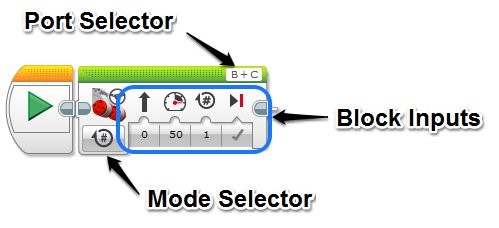
The EV3-G programming environment is very user friendly, aimed at young kids, and you don’t need a programming background to get started. General robot commands are represented by Blocks, and each of the Blocks can be customized through the use of Modes and Block Inputs. Ie. The ‘Move Steering’ Block will tell the robot to drive around, but the Mode and Block Inputs will control how far / how fast / what direction etc.

The most common block I use is the Move Steering, as it is designed to control a robot with two opposing wheels (sometimes called differential drive or wheel chair configuration). If both motors go forward, the robot goes forward, if both go backwards, the robot goes backwards. If the motors go in different directions, then the robot will turn. By changing the ratio of speed between each motor, you can get very fine control of turning angles.
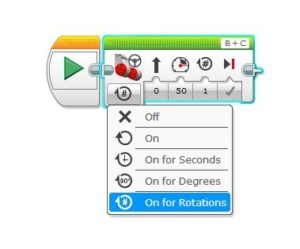
The Move Steering Block has 5 different Modes, OFF, ON, On for Seconds, On for Degrees and On for Rotations. Each of these modes do the same essential thing, move the wheels, but allow you to choose how they will be moved. The Block Inputs then allow you to fine tune the movement.
- Steering – Left or right? Gentle turn or sharp turn?
- Power – Fast or slow? Forwards or Backwards?
- Duration – How much should the wheels turn? Seconds / Degrees / Rotations
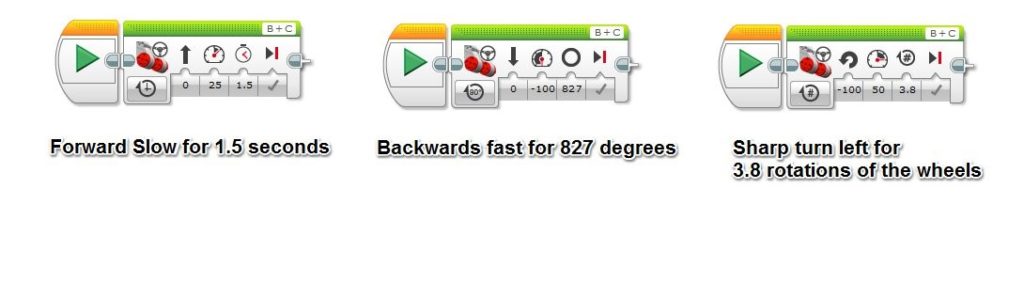
Here are a few examples
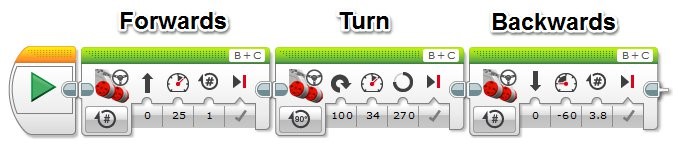
To make the robot perform multiple moves (forward, turn, backwards) we can put Programming blocks together.
Make it move
Plug the USB cable into the back of your RileyRover, make sure it is turned on and press the green Play Arrow Block. Hold your robot off the table as it will run the moment the program finishes downloading and we don’t want your robot to go on an unscheduled bungee jump. If all has gone to plan, the wheels on the robot will have moved!
How far did your robot travel? Well that will depend on what you setup with the Block Inputs.
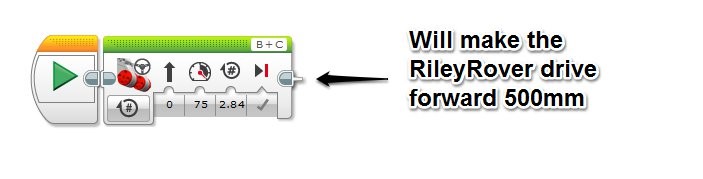
While we can control how much the wheels rotate (either in seconds, degrees or rotations), this doesn’t tell us directly how far the robot goes. Often when we’re faced with a robotics challenge, there will be some part of the challenge where we have to make the robot drive a specific distance, say 500mm.
Now we could try and guess how much we need to move the wheels and do some tests. We could keep modifying the numbers and keep testing until we got the exact distance we need. This is often called Trial and Error or Guess and Check. While this approach will work, it is time consuming. If we have a dozen different distances we need to travel, the time we need to check every one will start to add up very quickly. With a little bit of basic Math and some measurement of our robot, we can find a much easier way.
What would be really useful to know is, ‘How far does the robot travel when the wheels do one complete rotation?’ Imagine the point where the wheel touches the ground. As the wheel turns, that point follows right around the edge of the tire and eventually touches the ground again. This distance is the circumference of the wheel and can be calculated with the following formula.
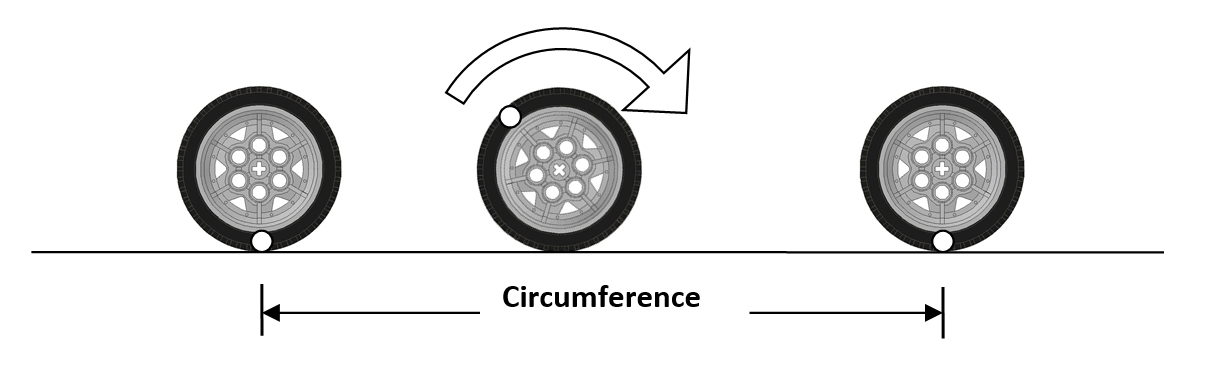
Circumference = pi x diameter
For the LEGO wheels used in the Education Version of the EV3, the diameter of the wheels is 56mm. If we take pi as being approximately 3.14, then we get a circumference of
Circumference = 3.14 * 56mm
Circumference = 175.84mm
This means that when the wheels of the robot turn around 1 complete rotation, the robot will travel forward 175.84mm.
NB. If you’re using the Home edition of the EV3, you have much smaller tires, only 135.65mm in diameter. Adjust your calculations as necessary.
Try it out and see how close your RileyRover goes.
Once we know how far 1 rotation will take us, we can then do a little more Math to calculate how many degrees of the wheels we need to travel any distance we desire. Let’s revisit our earlier challenge of making the robot drive 500mm.
Circumference
We know that 1 rotation = 175.48mm. If we divide 1 rotation by 175.48mm, this will tell us how many rotations we need to travel 1mm.
1mm = 1 / 175.48 = 0.0056987 rotations
We need to go 500mm so:
500mm = 500 x 0.0056987 = 2.85 rotations
Now in reality there a few factors that mean that it might not be exactly right, friction with the floor, carpet vs hard floors, squishyness of the tires etc, but the result certainly does get us extremely close to what we’re trying to achieve. Tweak it just a little and you’ll be good to go!
Using this same approach, we can now calculate how many rotations of the wheels we need to travel any distance we want!